-->
≡
Home
Woman
Sport
Business
Health
Privacy Policy
Contact Us
Contact Us
How to paint realistic luscious leaves in watercolour with Anna Mason
:
:
2017-09-28T12:49:59Z
Thursday, 28 Sep 2017 - 12:49 PM
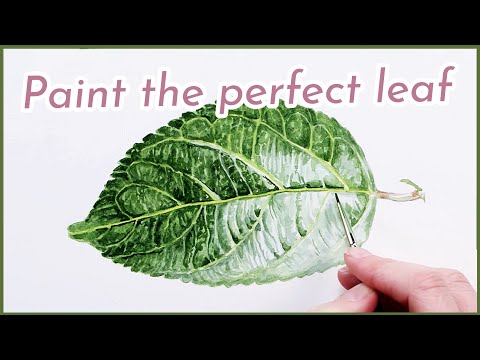
Hi it's Anna Mason, and in this watercolour tip video I wanted to show you my glazing
method for painting leaves.
This works especially well for painting any deciduous type leaf which contains lots and
lots of veins to it.
Like these apple leaves.
You may have found these overwhelming to try to paint and get them looking realistic if you've tried them before.
Either you attempt to ignore the little micro veins in them altogether and you end up with smooth,
more stylised leaves, or you can get obsessed adding too much veiny detail and they don't
look right either.
So here's my method for getting the balance right.
I started with a drawing where I marked in the most prominent of the veins - the central
one and the ones coming off of that.
When we look at the photo I'm working from, we can see that these veins are a pale yellow
colour and, because they're pale, I want to paint them first.
And when you zoom right in and look super closely you can see that this colour is also
present in the tiny little veins that come off of the secondary veins and the even smaller
ones that come off of them.
But as we're painting at this size, we don't actually need to paint all of those tiny veins.
If we were painting the leaf at twice the size - or even
more, then we'd need to add
more of these veins in to achieve a realistic level of detail.
But when we're painting at this sort of size we just need to create the impression of these
smaller veins as we paint.
And in addition, those tiny veins are so thin that they actually appear a shade darker than
the wider veins when we're viewing at this scale.
So what we're going to do now is to focus on painting the widest of the veins which
are highlighted here and they're easier to see against a white background.
Being widest these veins stand out more strongly against the darker leaf colour around them
so it's these that we're going to paint with the yellow mix.
I apply the watery yellow colour to the main veins, not worrying if I paint over the pencil
boundary as I'll be working with darker colours around the veins to define them later.
Next I paint the watery blue-green shiny highlights to the leaves to make sure that I had those
in the right places, before going on to paint a watery pale version of the main green of
the leaves everywhere else, using a small brush and taking care to work around the yellow
of the veins.
With that dry I go in with the very darkest tones within the leaf next.
Using a thick dark green mix, I apply with a small brush, making sure to leave lots of
gaps to create the impression of some of the tinier veins in the leaves.
This is something that you can get quick at with practice but it's important not to get too
formulaic and uniform in your application.
It does take a while but it's so important for creating realistic looking leaves.
Next I water down the mix a little to work on the darker midtone parts of the leaves
too.
The leaf is now looking really disjointed with all those gaps I've left standing out
way too much.
So it's time to unify them a bit by applying a glaze over them.
For this I use a mix that's not as watery as the first ones I used, but more watery
than the ones I've just been using.
I work gently with my brush so that I don't disturb the little markings I'd made before.
I then use this same consistency mix to create smaller shapes into the lighter parts of the
leaf, just as I did with the thicker mixes in the darker parts.
With that layer dry I'm into the adjustment phase where I darken the veins again to bring
them back in balance, then the darkest tones again to get them looking right and the lighter
midtones again to get them in balance too, before I apply another glaze over the lighter
tones within the leaves to darken those micro veins some more.
After I add a few more adjustments and details the leaves are finished.
A full video class of these apple leaves showing you what colours I use and each step of the
painting in thorough detail, is available now in my online School.
If you've enjoyed this tip video, please subscribe to my YouTube channel and I'd love it if you'd
share this video with your friends.
And if you'd like to take one of my tried and tested video classes for free, hop on
over to AnnaMasonArt.com where you'll find even more
resources to help you pick up your brush and paint the way you've always wanted to.
Remember, you won't improve your painting unless you make the time to paint.
So be sure to schedule in some me-time this week and paint something that you love.
Thanks so much for watching and I'll see you soon with another tip for creating watercolours
with 'wow'.
Realistic Smoking Red Lips Painting Timelapse How to paint realistic 'bloom' effects on fruit in watercolour - with Anna Mason How to paint cake sponge in watercolor How I rediscovered watercolor and made it my career Painting a realistic hand in watercolour - timelapse with Anna Mason How to paint succulent leaves in watercolor How to paint a realistic pear in watercolour (preview of a FREE class) How to mix complex colours in watercolor Anders Zorn Limited Palette Art: Hyperrealism Painting Lips
Facebook
Twitter
Google Plus
AnnaMasonArt
Latest Posts