-->
≡
Home
Woman
Sport
Business
Health
Privacy Policy
Contact Us
Contact Us
【HOW TO DRAW】 Male Manga Character
:
:
2018-01-04T11:22:20Z
Thursday, 4 Jan 2018 - 11:22 AM
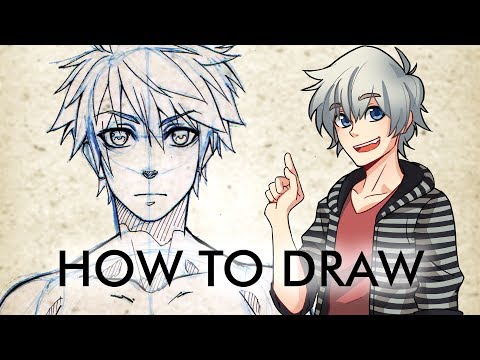
Hello again, In this video I will explain how to draw a
male Manga character - or to be more precise - How I draw a male manga character.
Since Manga Anatomy is more stylized if you compare it to real human anatomy, the drawing
probably will turn out a bit more….let’s say rough.
I’ll try to break it down to a few easy steps, so it’s easier to follow.
Also we will focus on a frontal shot of the character.
When it comes to more complicated poses, I usually look up references but that will be
a topic for a different video.
Anyway, let’s get started.
There are a lot of different ways to start drawing.
For years I used to start with the right eye and work out the rest from there.
But I figured that the circle method that you probably have seen in loads of other tutorials
already, helps limiting yourself to a certain size.
If you start with just an eye, it could sometimes get out of control and your character doesn’t
fit on your paper anymore.
So I start with a circle and put a line in the middle and drag it down a bit.
Just for this video I use a blue pencil so I can later draw the lineart on top of it.
You can use a normal pencil as well, HB or B leads work best in my experience.
Then I extend the circle because a head is a bit more oval than a circle.
So I draw the jaw line.
The dimension of it should be up to you: You could emphasize the jaw line by making the
line more angular, or you soften it by making it very round.
Since I am doing an ordinary frontal shot, it’s important that the chin is the lowest
part and stays visible.
That would be different with different angles.
I try to make both sides symmetrical, but it doesn’t need to be perfect, it just shouldn’t
look off.
We have an oval shape now and we can use that to find the middle of the face, so I draw
a line there.
This is where the eyes are going to be.
I place a circle on the line and the other one next to it.
The distance between them should typically be one eye length, so you can also use another
circle of the same size to figure that out.
Because the jaw line I drew hints towards a more mature manga figure, the eyes aren’t
going to be as big as you would make them for a younger or even shoujo character.
The nose is placed on the crossing point of the circle and the middle line, while the
mouth is placed just in the middle underneath the nose and chin.
The throat is just two lines that go down from the oval.
I make them about as long as the distance between the mouth and the chin is.
From that I work down to the shoulders using a triangle shape, that also helps me to figure
out where to draw the collar bones.
Depending on how muscular the character shall look I add some detail to them.
Now let’s get back to the face.
To draw the eyes there are endless ways to do it and just for the record, I am not that
consistent with that in all of my drawings either.
For this tutorial I’ll do what I probably do most of the time.
So i draw an upper line and add another one down, to form the lashes.
Then a crooked single line for the lower lash line.
Drawing a simple circle for the pupil of each eye is enough for now, you just want to make
sure they look in the same direction.
Now that we have done the eyes, let’s add eyebrows.
Where and how you put those really depends on the expression you want the character to
have.
About hair.
With most haircuts I try to stick to a point where I can direct the hair from, so that
in the end it looks dynamic and not just messy.
From this point you can draw curved lines to form the basic shape of the hair.
It also helps a lot with coloring to have such a focal point.
It also doesn't need to be just a point, for hair partings for example a line is more useful.
I add more definition and details by drawing single strands of hair.
I think of them in layers of hair, that might point in some different directions, but still
have the same point of growth.
Tip: To keep the hair in a natural and dynamic shape, we don’t want to draw straight lines
from the focal point.
They should typically be curved.
Try to experiment with bigger strands of hair and thinner ones, because a combination of
both usually looks really nice and natural.
With a thin fineliner, in this case a Copic Multiliner, I do the lineart by tracing only
those lines of the sketch that were not done to serve as just guiding lines.
To get very clean outlines the best tip I can give you is to draw big lines using just
one stroke instead of carefully placing line after line together to create a big one.
Drawing a line in one stroke perfectly though is difficult and you need to be a bit brave,
but let me assure you, it gets better the more you practice.
Let’s continue with the body: I begin to sketch the chest with an oval underneath
the collarbones.
To get a better orientation and also to divide the breast into two, I extend the line in
the middle that we used for the face.
For the shoulders I add an egg on each side of the oval.
By drawing a diagonal line on each side underneath, roughly following the oval, I define the breast
and make two dots for the nipples.
From that I roughly sketch an isosceles triangle to find the right spot for the belly button.
Whether it is higher up or down is up to your taste.
Same as with the size of the breast, I like to play around with it a little bit.
Now that we have the distance between chest and belly button, we can use that to divide
the area into three equally sized sections that will guide us to draw the abs.
Since the arms cover tiny parts of the body I start now quickly sketching them using the
lighting bolt technique that I have learned years ago from watching one of sycras videos.
Link will be in the description.
It’s basically just drawing a thunderbolt and using that as an orientation to draw the
upper and lower arm.
The elbow should be around the belly button area.
For the rough body shape I draw two slightly curved lines down from the breast, that both
end around the navel area.
Just like with everything else, you can decide whether your character should look more pumped
by changing the angle and distance between those lines.
I draw one last oval around the belly button so I have a little guide for the external
obliques and can create a nice v-line.
For stuff like that it is really helpful to look at anatomy books or just photographs
so don’t forget muscles that might not be as prominent as abs.
While we are at it, let’s start defining the stomach.
On the lines we created earlier draw the abs by putting a little curve there.
Try to not connect these lines so they don't just look like rectangles.
The width is determined by the chest.
I imagine some vertical lines going down from the lowest part of the breast and use that
to estimate where the abs are set.
For details like the ribs I add tiny curved lines that we put just right underneath the
breast on both sides.
Now we just need to outline the body and we are done.
Of course, if we take a close look the body might have some mistakes, but we can get rid
of them by scanning the piece and correcting the lineart in Photoshop.
I usually flip the image and use liquify to push away any oddities, or even resize the
body or head for example.
After that I could work on it digitally or print out the lines to trace it with a light
table for the final lineart that I would then color with traditional media.
The final result looks a bit stiff since there is no dynamic in the pose, but for this tutorial
I just wanted to focus on how to draw a male character so the pose should be as easy as
possible.
That way it’s easier to follow the steps.
You are of course free to take what you want out of this tutorial and draw anything you
like.
Maybe you are even motivated now to try more difficult poses.
Regardless whether you are a beginner or professional, I hope you found this video interesting and
leave a like or comment on what you want to see next.
I am also thankful for every new subscriber ;D Thank you very much for watching and I
hope to see you next time.
【Flipping through my Drawings and Sketches】Best of 2017 【DOS AND DONT'S】5 Watercolor Mistakes to avoid How to Draw: Male Manga Body Tutorial How to Paint with One Color! / (Monochromatic Studies w/ Watercolors!) 【My First Selfmade Artbook】 sponsored by Skillshare Teaching Myself How To Draw Anime in 3 Days! [Art Challenge] 【This isn't ART?】Studying Art at University 【What do you do in Art School?】Portfolio & 5 Years of Work 【My Original Character】sponsored by O.C. Amino Tutorial - 2 ways to start a face!
Facebook
Twitter
Google Plus
Laovaan
Latest Posts